![]()
Beautiful Plants For Your Interior
![]()
Beautiful Plants For Your Interior
The Line 6 brand has developed a wide range of efficient and inter-compatible products. Line 6 effects processors are widely used by guitarists. Line 6 models are often present on the biggest stages. They all contain integrated impulse response files in the form of modules that can be installed in the effects chains. They are also almost all compatible with third-party Impulse Response files. Let’s find out how to use and configure impulse response files with a Line 6 effects processor.
Line 6 is a well-known brand in the music industry. Originally American, the Line 6 brand is now owned by the Japanese firm Yamaha. It specializes in manufacturing accessories for guitars: amplifiers, pedals, processors, wireless systems, and more.
The Line 6 brand has a large family of guitar effects processors called the Helix processors, including the Helix Floor, the Helix POD, the Helix LT, and the HX Stomp. These devices use the same software called HX Edit, allowing users to configure presets from a computer.

In an effects processor, IR files, or Impulse Response files, play a crucial role in simulating realistic sounds, tones, and acoustic environments. They allow the capture and reproduction of the acoustic characteristics of an instrument, speaker, space, or any other acoustic system. Guitarists are big fans of these files for adding character to their tone. They use them especially to replicate the sound of renowned speakers and tube amplifiers!
Firstly, install the HX Edit software. It allows you to work on your presets from your computer. It’s much simpler to work from your computer than from the small interface of your processor.
Install HX Edit by downloading it from the official Line 6 website. It may be recommended by Helix to upgrade your processor’s firmware. Backup your settings before launching the update.
There you go! You’ve connected your Line 6 processor to your computer, it’s up-to-date, and recognized by the HX Edit software.
Don’t forget to prepare your Impulse Response files on your computer, we will load them into the processor. If you don’t have any, note that we sell impulse response files of acoustic instruments.
Launch the HX Edit software and click on the ‘IRs’ tab located at the top right of the software window. This is where you can load and store your IR files. Import one or more files to create your first preset based on an Impulse Response.

Each Helix unit also comes with its own set of Impulse Response files. However, it’s important to note that these may vary depending on the Helix model, which can complicate the importation of presets that have not been created from the same effects processor. These IRs are impulse responses of speakers and amplifiers that you will find in the list of available effects under the names: Amp, Amp+Cab, Cab, and Preamp.
Select a preset location to start creating a new preset, or duplicate an existing preset to add an IR file in it.

If you want to use the built-in amp and/or speaker impulse responses in your processor, click on the module location and then select the ‘Amp’ category, for example, and choose one of the offered amplifiers to add it to your effects chain. To access your own impulse response files, click on the ‘Impulse Response’ category where your imported IR files are listed. Below is an example of a linear effects chain with an amp module.
These modules offer initial adjustments for your Impulse Response file. Your own impulse response files have settings such as Low cut, High cut, Mix, and Level. Other categories like cabients, amps, or preamps have more settings. You should use these adjustments to start shaping your sound.
It all depends on what you are looking for and the impulse response used. Most of the time, we follow the logical implementation of IR capture. There are different possibilities. An impulse response file of a cabinet represents a capture of the end of a sound chain. The speaker is always the final element of an audio signal. It reproduces the sound produced by the musical instrument. Generally, this element is placed at the end of an effects chain. The position of a microphone impulse response module should be considered based on the location that this microphone would have during a real capture. By example, if it captures the sound produced by an amplifier, it should be positioned after an Amp module.
In the case of impulse response files of acoustic instruments, it is better to place an Impulse Response at the beginning of the effect chain. The purpose of these IR files is to reproduce the tone characteristics of acoustic instruments like the guitar, violin, or cello. The logical position of an impulse response from the body of an acoustic instrument is therefore at the start of the audio signal.
Of course, there is nothing stopping you from experimenting with different positions to achieve varied sounds!
Typically, processors allow effects to be applied linearly. Next-generation effects processors allow for signal splitting. This system enables combining signals before grouping them at the end of the chain. Thus, it is possible to blend different IR files in the same preset. To do this, position two IR files linearly, then offset one of them downwards to create a separate timeline.
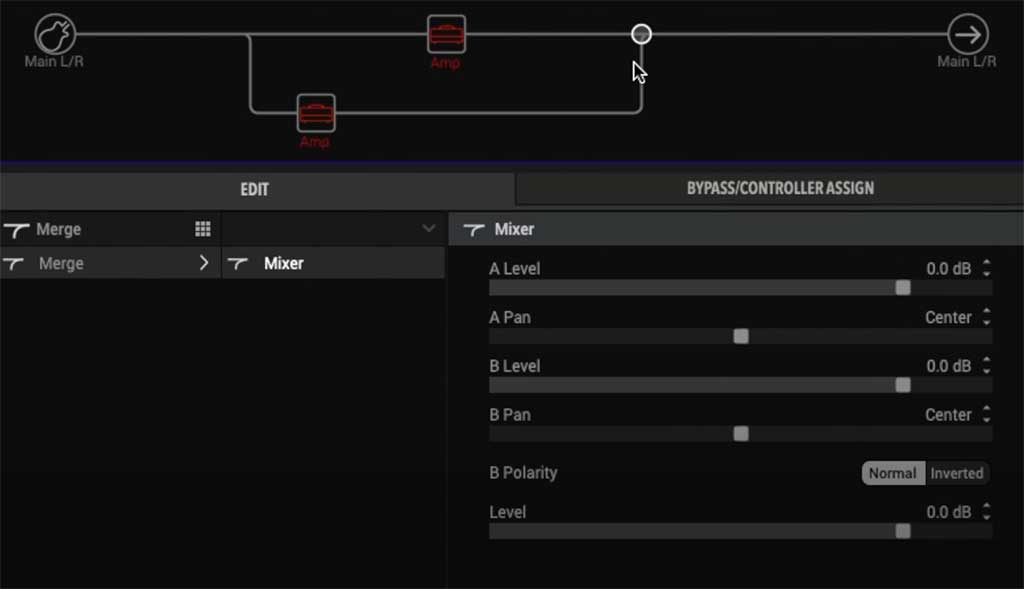
By clicking on each timeline intersection, you can adjust the blending between the different signals. Note that Line 6 processors have a setting for managing the phase of the second signal (B Polarity). We will discuss the implementation of this concept a little later. If you are not familiar with the process of IRs blending, please refer to our article on this topic.
Adjustments are available, and any modification inevitably results in a change in the audio signal. IRs are sound captures already containing amplification through a system. Therefore, it is necessary to ensure that the level between signals A and B is not too high. Feel free to play with the blend between the two signals to find the sound that suits you.
The problem can arise from phase management and adjustment. Indeed, it is possible that the signals from the IR files are out of phase, which will result in poor sound quality (reduced sound level, unusual crackling, sudden disappearance of sound). There are two adjustments to test to try to limit phase problems.
From the intersection module between your two IRs, you will use the B Polarity and B Level settings. While strumming on your strings, adjust the B Level setting to find a signal loss or decrease. Once the problem is identified, adjust the B Polarity setting by positioning it at the lowest to the left. The procedure is extremely well detailed in the following video.
Despite this adjustment, phase issues may occur in several areas. The possibilities for adjusting the phase on this type of device are limited. Blending cabs or amps will be easier than blending IRs of acoustic instruments (violin, cello, acoustic guitar, double bass, etc.) or environments (cathedral, hall, concert hall, studio, etc.). These impulse response files depend on many factors during sound capture, which greatly complicates their use.